Configure the Basics
Everything you set here lives in the parameters panel on the left of the main window.
For the quickstart we'll touch just a handful of controls and leave the rest at their
defaults.
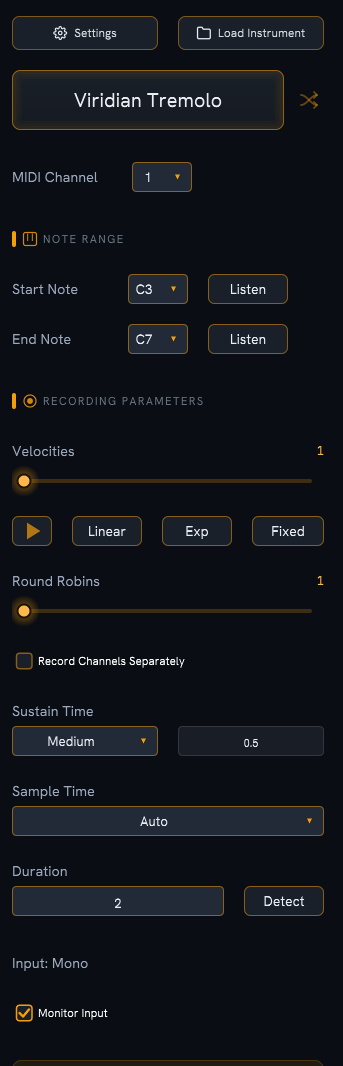
Name your instrument
At the top of the panel is the instrument name. Click it to type your own, or click the shuffle button next to it to roll a random name. This name is used for the recorded files and the exported instrument.
Set the MIDI channel
Set MIDI Channel to match the channel your instrument listens on. The default is 1, which is correct for most gear set to "omni" or channel 1.
Choose the note range
Note Range sets the lowest and highest notes the app will sample. Pick a Start Note and End Note that cover your instrument's useful range. The defaults — C3 to C7 — are a good general-purpose range. Use the Listen button beside each dropdown to play that note and check it sounds right.
Note names here may differ from your DAW
Sampling Assistant names octaves so that MIDI note 60 is C5. (So C3 is MIDI 36, C7 is MIDI 84.) Many DAWs label MIDI 60 as C3 or C4 instead. The pitch is identical — only the octave number in the label differs. If a note looks an octave or two off compared to your DAW, this is why. See Note Range & Note Names.
Start small
Sampling every semitone takes time. For your first run, a couple of octaves is plenty — you can always do a fuller range later.
Leave velocities and round robins at 1
For the quickstart, keep:
- Velocities = 1 — one recording per note.
- Round Robins = 1 — one variation per note.
These are the defaults. They give you a simple, single-sample-per-note instrument — the fastest way to see the whole workflow. When you want more realism, add velocity layers and round robins later.
Set how long each note records
Two controls decide the length of each recording:
- Sustain Time — how long the app holds each MIDI note down. Leave it on Medium (0.5 s) for now. (Other presets: Short 0.1 s, Long 2.0 s, or Manual.)
- Sample Time — how the recording length is decided. Set this to Manual and enter a Duration of 2.0 seconds. That captures the note plus a little tail.
What's "Auto"?
Left on Auto, Sample Time figures out the duration for you when you press Detect. It's handy once you're comfortable — for the quickstart, a fixed 2-second Manual duration is simpler and predictable. Full details in Sample Duration & Sustain.
Sanity-check the summary
Near the bottom, the summary box totals up your settings:
- TOTAL SAMPLES — how many files will be recorded (notes × velocities × round robins).
- ESTIMATED TIME — roughly how long the run will take.
- ESTIMATED SIZE — the disk space the recordings will use.
Glance at these to make sure the run is the size you expect. A two-octave, single-layer instrument is a handful of samples and finishes in a minute or two.
Next: record it
Settings look right? Time to press the button → Sample It.