Note Range & Note Names
Note Range decides which notes Sampling Assistant plays and records. You set the lowest and highest note, and the app samples every semitone in between.
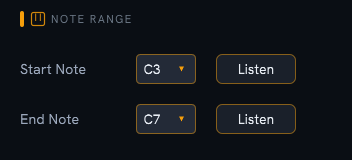
Set the range
- Start Note — the lowest note to sample. Default C3 (MIDI 36).
- End Note — the highest note to sample. Default C7 (MIDI 84).
The End Note list only offers notes at or above the Start Note, so the range is always valid. In both dropdowns, C notes are highlighted so you can find octave boundaries at a glance.
Pick a range that covers your instrument's useful span. There's no need to sample dead zones above or below where it makes sound — every extra note is another recording.
Start small, expand later
Sampling every semitone across a wide range takes real time. For early runs, a couple of octaves is plenty. You can always re-sample a fuller range once you're happy with the results.
Preview with Listen
Next to each dropdown is a Listen button. Click it to play that note on your instrument so you can confirm the pitch and that it's responding before you commit to a full run.
How octaves are named
This is the one place where Sampling Assistant may not match your DAW.
Note names here may differ from your DAW
Sampling Assistant numbers octaves so that MIDI note 60 is C5. So:
- C3 = MIDI 36
- C5 = MIDI 60
- C7 = MIDI 84
The octave number is simply
MIDI note ÷ 12. Many DAWs label MIDI 60 as C3 or C4 instead. The pitch is identical — only the octave number in the label differs. If a note looks one or two octaves off compared to your DAW, this is the reason.
This naming is used everywhere notes appear: the dropdowns, the NoteCard grid, the octave separators in the grid, and the recorded file names.
Next steps
- Add expression with Velocity Layers and Round Robins.
- Set how long each note records in Sample Duration & Sustain.